
Some time ago my wife decided to get involved in an affair. The solicitor at the checkout was enticing and charming enough. Yhm… a few years earlier my home Back UP drive from Seagate died. These two facts have no relation to each other whatsoever!
A few months I lived, believing my wife started social life, finally making some friends. For a few years, I was dealing with data stored on a few drives. And finally, … I found a solution to home backup of various data: NAS. But, since I never take the simplest path to achieve something… I decided to go for NAS based on Raspberry Pi. Since I get Raspberry Pi as a Christmas Gift – another thing was some HAT extension to be found.
I found one – extremely expensive and impossible to get… Hmm… but I get lucky to get a 2nd-hand piece. Along with an extra Pi 4B board, PSUs, Flashcard, case… some SSD drive. Quite cheap I think.
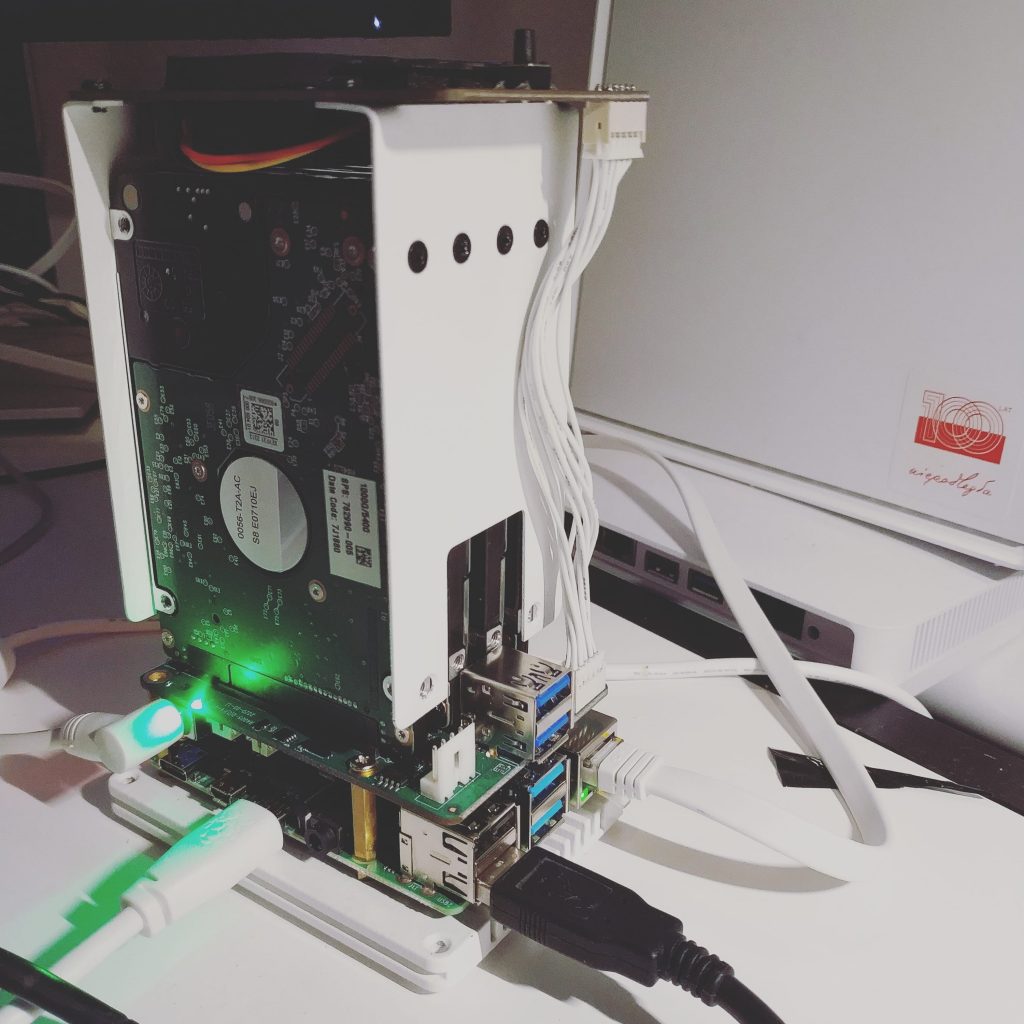
But let’s get to the point. I received the goods and built my very first NAS. I will spare you the details and photos from the building stage, but I owe you one note here: if you will mount the HDDs in the frame – you may be surprised by the fact that SATA connectors will not match. Keep that in mind and be patient. And try not to break anything.
Once you have all HDDs mounted, do not put the cover yet – as the access to the microSD card is limited. The OS for Raspberry Pi is up to you. I used standard lightweight Raspian. Boot up the system and start configuring your NAS.
Please note, that there are a few tutorials about it – here I am trying to combine at least three of them I found useful for my setup. Credits at the end!
I assume now, that your system is ready and you are SSHed to your device. The first thing you need to do is this command:
curl -sL https://rock.sh/get-rockpi-sata | sudo -E bash -
Just copy the command from the box above and paste it into the terminal. Press enter. The manufacturer provides an install script to help you get the SATA software that works in Raspberry Pi 4B. This is happening now!
If your hardware is correctly set up, installation should take some time, and shortly after, your HW should be ready. You can check it out by this command:
pi@piMediaServer:~ $ sudo systemctl status rockpi-sata.service
● rockpi-sata.service - Rockpi SATA Hat
Loaded: loaded (/lib/systemd/system/rockpi-sata.service; enabled; vendor preset: enabled)
Active: active (running) since Wed 2021-01-20 07:35:42 CET; 10h ago
Main PID: 699 (python3)
Tasks: 7 (limit: 4915)
CGroup: /system.slice/rockpi-sata.service
├─ 699 /usr/bin/python3 /usr/bin/rockpi-sata/main.py on
├─1484 /usr/bin/python3 /usr/bin/rockpi-sata/main.py on
├─1485 /usr/bin/python3 /usr/bin/rockpi-sata/main.py on
├─1486 /usr/bin/python3 /usr/bin/rockpi-sata/main.py on
└─1487 /usr/bin/python3 /usr/bin/rockpi-sata/main.py on
It should point whether the service is working (active?).
Now it is time for the Software part. OMV will be installed. Thanks to the available script, it will be a single line that you need to enter into the terminal at Raspberry:
wget -O - https://github.com/OpenMediaVault-Plugin-Developers/installScript/raw/master/install | sudo bash
Believe me, it is one line only that was wrapped. And this is the moment where you should be calm and cool. It will take some time to process it. It is safe, when the script is running, to click out of the SSH window not to get the process interrupted. It is like the time when your Commodore64 was reading the tape with your favorite game…
After the installation is complete, the Pi will change its IP, so do not be surprised that SSH is not responding. Now you can use your PC’s browser and try to enter the service IP to get the OMV’s Web UI.
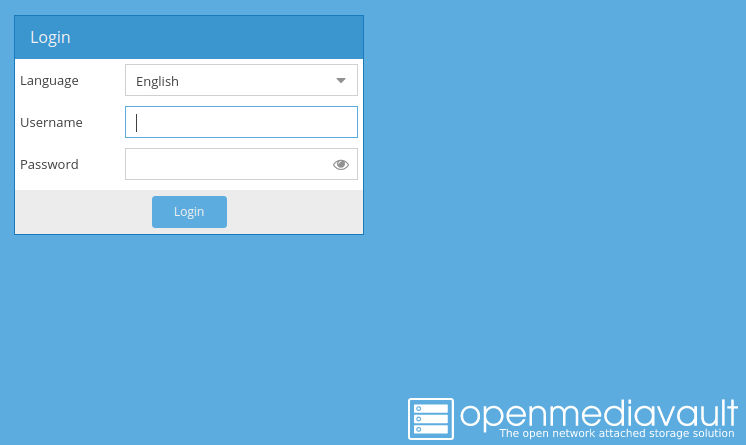
Now it is time to log in. Be aware that default credentials are: admin/openmediavalut – remember to change it in the future. Go to “System” -> “General Settings” -> tab “Web Administrator Password“.
Go back to Pi’s terminal. Now, because the OMV will not allow you to create RAID with the USB connected drives (yes, your drives are connected to Pi with a special double-USB 3.0 connector), you need to create your RAID manually with this command:
sudo mdadm -Cv -l5 -c64 -n4 -pls /dev/md0 /dev/sd{a,b,c,d}
I will not go into details, but you can find out yourself what those mysterious options do. It is up to you. One thing you should be aware, this is the RAID built with 4 HDD of the same size, type RAID 5. The operation is quite fast – it is not time to go for a coffee.
Raid is pretty useless without a file system. Use this one to create ext4:
sudo mkfs.ext4 /dev/md0
Note, that we created md0 – you can type anything different – it is one more time: up to you!
The next steps will be performed in the OMV. Go to “Storage“. We now check if the software sees your RAID. Check inside “RAID Management“.
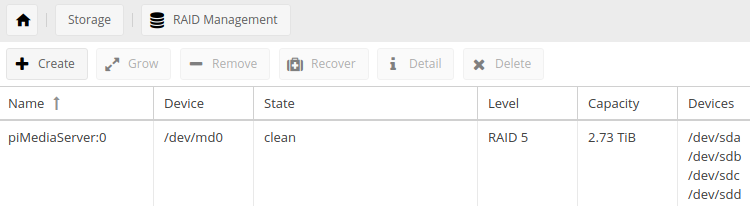
Moreless, it should give you something like this. Now, go to “File systems“. Here, make sure that your RAID is mounted. If not, mount it – there is a quite BIG button for that. You should not miss that, unless your glasses are… =/-12? This time, you have to do it without a screen-shot. I can not abuse my Pinta!
The system (OMV) can point out that the configuration has been changed – and you may save it right now. Do it. I won’t hurt… Not yet, at least.
If these two, easy steps are done, now it is time to go to “Shared Folders” under “Access Rights Management” – someplace where any IT admin feels safe and sound. You need to add share now: find the “+” (plus) with “Add” – and, this is very important, very gently press the button. New windows will pop up: Name your share, point the Device, and set Permissions – preferably to “Everyone: read/write“. Let’s start with something easy. Then Save it.
It is not done and ready yet. Go now to “SMB/CIFS” under “Services“. In “General Settings” Enable the service and then got Shares tab: add the share created in the previous step: choose the right “Shared folder“, make it Public with the option “Guests allowed“, and Save.
Now it should all be done, and while browsing your network, the proper Shares should be visible… This is the place where we could simply finish. But we are not there yet.
Now the fun begins. We will play now a bit with the OLED screen that is on the top of the “shell”. There are quite good defaults developed by the manufacturer, but we can squeeze a bit more from it. A customization! Bum! Since it is strictly software related – we need to go back to terminal/shell once again.
In order to change the OLED behavior and the related button you need to edit file: /etc/rockpi-sata.conf
[fan]# When the temperature is above lv0 (35'C), the fan at 25% power,# and lv1 at 50% power, lv2 at 75% power, lv3 at 100% power.# When the temperature is below lv0, the fan is turned off.# You can change these values if necessary.lv0 = 35lv1 = 40lv2 = 45lv3 = 50[key]# You can customize the function of the key, currently available functions are# slider: oled display next page# switch: fan turn on/off switch# reboot, poweroff# If you have any good suggestions for key functions,# please add an issue on https://rock.sh/rockpi-sataclick = slidertwice = switchpress = none[time]# twice: maximum time between double clicking (seconds)# press: long press time (seconds)twice = 0.7press = 1.8[slider]# Whether the oled auto display next page and the time interval (seconds)auto = truetime = 10[oled]# Whether rotate the text of oled 180 degrees, whether use Fahrenheitrotate = falsef-temp = false
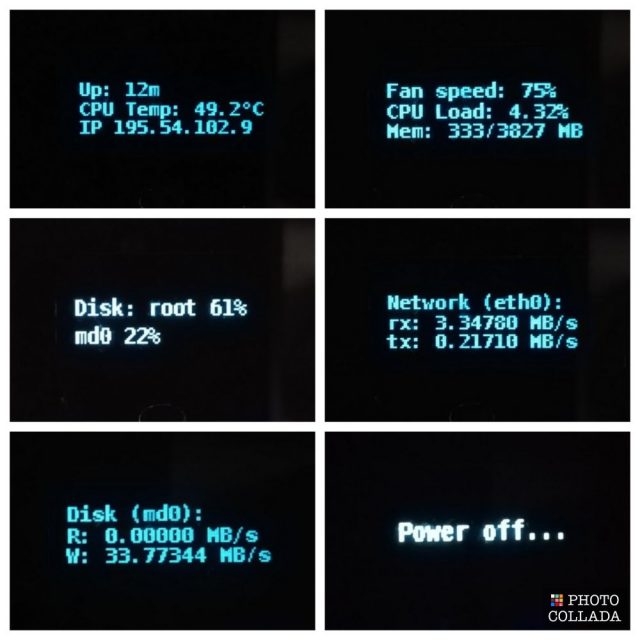
It basically allows you to control the fan behavior (based on the board temperature), configures key (button) action depending on the press type, enables the slider (OLED will show the info in a loop), defines key press intervals, and OLED features like rotation and temperature in Fahrenheit.
What is not present in the basic config, but was added by RayMondDrakon and those are nice-to-have features: extended disk info and networking state. For further details, please visit this page. Before you can point the RAID state to be printed by the OLED, you need to update two system files (python scripts). Here is the misc.py and oled.py – both should be updated inside the /usr/bin/rockpi-sata – and also my own rockpi-sata.conf is zipped.
If you want the OLED to print the state of your RAID, you need to extend the rockpi-sata.conf file with this declaration/mount point:
[disk]
# Mount points for disks (separated with |)
mnt_points = /srv/dev-disk-by-uuid-a058298c-6e32-4840-b207-ab07bfad84a2
Bit fuzzy, isn’t it? Note, that you can not put here /dev/md0 – it needs to be the mount point. How to get it? In terminal at your pi issue the:
pi@piMediaServer:/usr/bin/rockpi-sata $ df
Somewhere on the output list there will be your share, on the right you will see the mount point. No need to add root – it is printed always, by default. Once is it updated, you will need to reboot your Pi. Below you can find a few examples on how the OLED info pages look like and what you can get out of it.
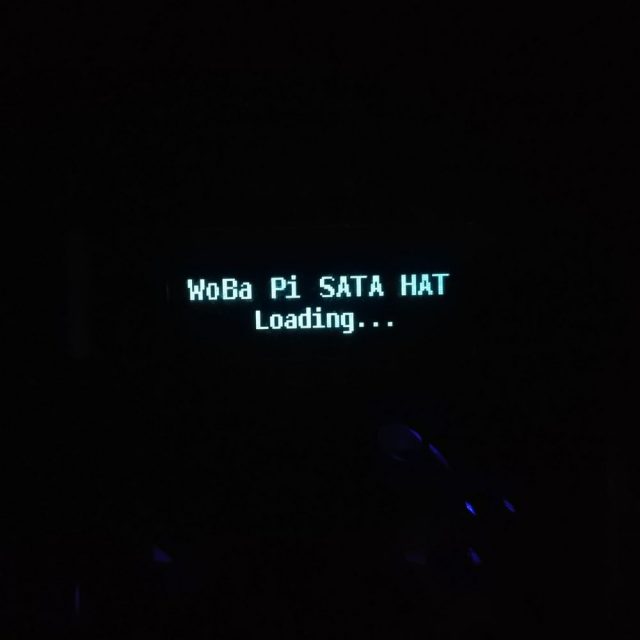
There is one more thing you can try out. That was not described earlier. The last modification I wanted to tell you about is the Welcome Screen, which is printed by the OLED only when Raspberry Pi is booted up and the HAT is turned on. If you go to file xxx you can find there this function:
def welcome():
draw.text((0, 0), 'Rock Pi SATA HAT', font=font['14'], fill=255)
draw.text((32, 16), 'Loading...', font=font['12'], fill=255)
disp_show()
Note, the first word in the “Rock Pi SATA HAT” can be replaced for whatever you like! Ha! Not only the 1st word, but the whole sentence can also be modified. Keep in mind the limit od the characters the OLED can show – I do not know the exact limit – but give it a try. This is how my welcome looks like.
That would be it. Feel free to comment, ask, share your ideas. At the bottom some useful link related to this howTo. One more time: great thanks to RayMondDrakon.
Credits:
Full Setup Quad Sata Hat for Raspberry Pi 4 NAS Review
https://wiki.radxa.com/Dual_Quad_SATA_HAT – Quad SATA HAT – wiki (not leaks!) – step-by-step tutorial and a lot more about this solution
Github /rockpi-sata thread related to OLED
Disk and network activity, fan speed percentage display on OLED display, improved uptime format

Next step: UPS. Also, get rid of sdcard or just leave it for /boot only.